 Download Help PDF (29MB) | Search:
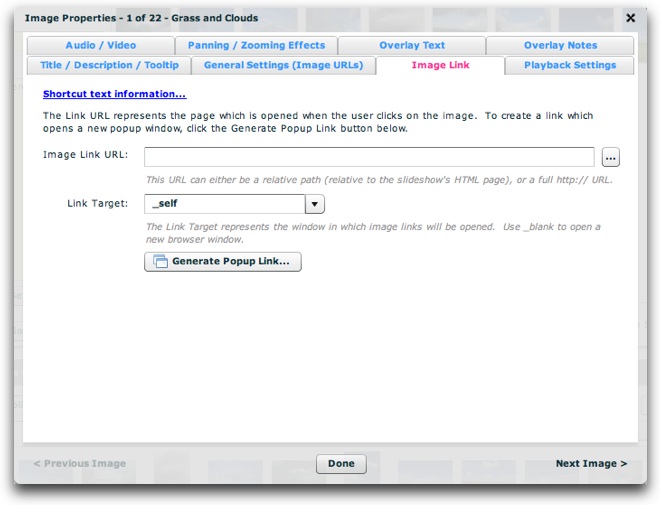
The Image Link tab of the Image Properties dialog is where you will specify the link which is attached to the image. This is the page which is jumped to when the image is clicked. The tab appears as follows:
Before covering all of the options, it is important to note the availability of shortcut text (also known as "replacement values") which can be used in certain fields to reference values in other fields.
In the title, description, link, link target, and tooltip fields, you can add a shortcut to other properties and attribute values on the image.
The following image-related replacement values are available:
Other less-common image-related replacement values are available too:
For all replacement values, you can use the following format to specify a default value: {image.property|Default Value Here} . Follow the property name with a pipe character (|) and the default value before the closing curly brace.
Note that you can use multiple replacement values in the same string.
One of the most common usage examples is setting the link URL to be {image.src} and the link target to _blank. This would make the full-size image open in a new browser window when it is clicked, allowing the user to view, download or print the original image.
| Property | Description |
|---|---|
| Image Link URL | This is the link which is opened when the user clicks on the image. The URL can be either a relative path (relative to the slideshow's HTML page), or a full http:// URL. You can use the browse button ('...') to the right of the URL field to browse for and select a page; in this case the proper path will be automatically generated. You can also call javascript by using links in the following format: javascript:void(myJavascriptFunction('param1', 'param2')); If you want to have the link open in a true popup window (which gives you control over the size and appearance of the window), you must use a special javascript link. The Popup Link Builder will automatically generate this type of link for you. See the Using the Popup Link Builder section just below for more information. Important note: Whenever using a popup link or a javascript link, you should set the Link Target option to _self. |
| Link Target | The link target represents the window in which the image link will be opened. Specifying a value here will override any gallery-wide defaults established in the Gallery Properties dialog. The default value of _self will open the link in the current window. Using _blank will open the link in a new browser window. Using _parent will open the link in the parent page if using frames. Specifying any other value will control a specific frame in a frameset. For control over the appearance and size of a new window, you must use a true popup window. See the Image Link URL property directly above for more information about this. Important note: Whenever using a popup link or a javascript link, you should set the Link Target option to _self. |
The Popup Link Builder builds the necessary links to open true popup windows when an image is clicked on. This feature is only available in the Pro version of the software - learn more about upgrading here. To get started, click the 'Generate Popup Link...' button:
The Popup Link Builder dialog appears as follows:
![]()
Each of the options control the following:
| Property | Description |
|---|---|
| Link URL | This is the URL which you want opened in the popup. The same guidelines apply as those for the Image Link URL propery shown above. You can use the browse button ('...') located to the right of the URL box to browse to and select the page you want to link to. |
| Dimensions | Specifies the width and height, in pixels, of the popup window which is opened. The first field is the width, the second the height. |
| Window Options | These settings control the appearance of the popup window. Note that some of the options are ignored by some browsers. By default, the popup window will be almost entirely blank; no toolbars or other chrome will be shown. |
When you're done configuring each of the options, click the OK button to generate the link and return to the main window:
Note: Some browsers may require your users to temporarily allow popups to be able to launch popups from the slideshow. You may want to provide a note mentioning this if you rely heavily on popups.
Automatic URL Jumping
You can also configure the slideshow to automatically open the image's link when the image is opened. To do this, you must enable an automatic jump for the Autoplay Delay setting in the Playback Settings tab of the Image Properties dialog. See the topic which covers that tab for more complete information. This feature can be used to create an intro-slideshow which automatically jumps to the main site once it finishes playing (i.e. the last slide is reached).
The settings above map to the following XML attributes on each <img ... /> node:
| Property | Equivalent <img ... /> Attribute |
|---|---|
| Image Link URL | @link |
| Link Target | @linkTarget |
Note that the '@' is part of customary syntactical representation, and is not part of each attribute name.
For more detailed XML information, see the Developer Reference.