Adding Lightbox Integration to EasyRotator
by Nathan Rohler
One of the most requested features we receive for EasyRotator is the ability to display photos in a lightbox when they are clicked. Lightbox viewing allows for photos to take center-stage, without any distraction from other page elements. We try to keep the basic functionality of EasyRotator as lean as possible; that's why you haven't seen this as a new built-in feature. However, we want to be sure that there's an easy way for you to add lightbox integration when you need it.
In order to provide this functionality, we're releasing today a ready-built script that makes it easy for you to add lightbox integration to any slider you've created with EasyRotator.
Demo
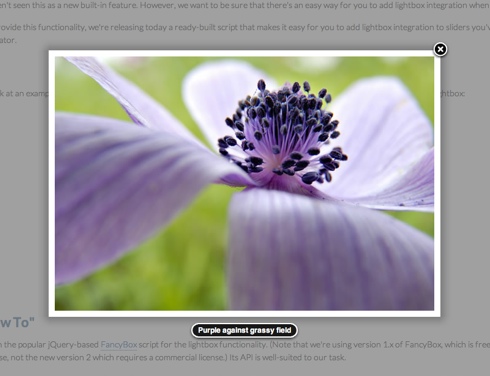
First, let's look at an example of the script in action. Click on any of the images in the following rotator to view the full-size photo in a lightbox. You can then use the arrow keys to navigate back and forth.


The "How To"
We've chosen the popular jQuery-based FancyBox script for the lightbox functionality. (Note that we're using version 1.x of FancyBox, which is free for commercial use, not the new version 2 which requires a commercial license.) Its API is well-suited to our task.
To simplify things, we've created a pre-packaged download that includes the FancyBox code along with the necessary add-ins for plug-n-play EasyRotator integration.
Step 1: Download the Special FancyBox Package
Download the ZIP file and unzip it. Place the resulting fancybox folder in the root folder of your site and upload it. (For example, it should be at http://www.yourdomain.com/fancybox/)
Next, you need to make modifications to the page that holds your EasyRotator slider. If you're using Dreamweaver, open the page that contains the rotator. If you're using WordPress, you'll need to edit your theme's files.
Step 2: Add FancyBox CSS to the <head> of Your Page
To ensure that the lightboxes are properly styled, add the following line within the <head> of your page:
<link rel="stylesheet" href="fancybox/jquery.fancybox-1.3.4.css" type="text/css" media="screen" />
You may need to modify the href property so that the highlighted path properly points to your fancybox folder.
Step 3: Add JavaScript Code Immediately Before the Closing </body> Tag of Your Page
Now we're ready to add the JavaScript code that actually makes things function. The location of this code is very important – the code must go at the bottom of your page, immediately before the closing </body> tag.
Here's the code to add:
<script type="text/javascript">if (!window['jQuery'] && window['er_$144']) jQuery = er_$144;</script>
<script type="text/javascript" src="fancybox/jquery.fancybox-1.3.4.pack.js"></script>
<script type="text/javascript" src="fancybox/jquery.easing-1.3.pack.js"></script>
<script type="text/javascript" src="fancybox/jquery.fancybox-easyrotator-sugar.js"></script>
<script type="text/javascript">
// Initialize lightbox for EasyRotator
addEasyRotatorLightbox({
   cursor: 'fancybox/zoom-in.cur'
});
</script>
As before, you may need to update the fancybox path references to properly point to the fancybox folder.
Performance Tip: To reduce download time, you may want to combine the three referenced external JavaScript files into a single file.
Step 4 (Optional): Customize Lightbox Behavior and Appearance
The section of the code highlighted in blue above is the important initialization code. If you are comfortable editing JavaScript and are familiar with its basic syntax, this code can be customized to modify the lightbox behavior and appearance. (Are you a JavaScript newbie? You can learn the basics from book #5 in our recent article, 7 Free eBooks that Should Line Every Web Professional's Digital Bookshelf.)
The addEasyRotatorLightbox method accepts two optional argument objects – options and lightboxOptions. The following properties are available for the options object:
| Property | Values | Description |
|---|---|---|
showFullCategory |
true (default) or false |
Specifies if each photo should be shown in isolation in the lightbox, or if the entire rotator category should be navigable from within the lightbox. The example above shows the default behavior (showFullCategory is enabled). |
text |
'none' or 'title' (default) or 'desc' |
Specifies what text (if any) should be displayed with each photo in the lightbox. By default, the title is displayed. You can use 'desc' to display the description, or 'none' to not display any text at all. (See the titlePosition property below for positioning options.) |
cursor |
CSS cursor value or URL to custom .cur cursor file. |
If not specified, the default value is pointer. In the code snippet shown above, we use the custom magnifying glass cursor (zoom-in.cur) that comes in the fancybox folder. |
pauseAutoplay |
true (default) or false |
Specifies if the rotator's autoplay feature should be paused when the lightbox is launched. |
filter |
jQuery selector | This is an advanced option. By default, all EasyRotator rotators in the page have the lightbox effect applied to them. If you have multiple rotators and only want the lightbox be applied to some of them, specify this property. The effect will only be applied to rotators within elements matching the specified jQuery selector. |
The second parameter, lightboxOptions, allows you to pass options directly to the FancyBox API. All available options are documented here, but here are some of the most common options:
| Property | Values | Description |
|---|---|---|
padding |
Numeric pixel value; default is 10 |
Specifies the width of the "frame" or border around lightbox photos. |
transitionIn, transitionOut |
'elastic' (default) or 'fade' or 'none' |
Specifies the transition used to open and close the lightbox. |
titlePosition |
'float' (default) or 'outside' or 'inside' or 'over' |
Specifies the position of the text displayed with each lightbox photo (see the text property above). |
Let's pull this together with a customized example. Suppose you wanted each lightbox photo to appear separately, with the fade effect, the pointer cursor and no text or border. Here's the code you would use:
// Initialize lightbox for EasyRotator
addEasyRotatorLightbox({
   showFullCategory: false,
   cursor: 'pointer',
   text: 'none'
}, {
   padding: 0,
   transitionIn: 'fade',
   transitionOut: 'fade'
});
Step 5 (Optional): Specify Custom Large Photos
By default, the lightbox will display full, unscaled versions of the main rotator photos. In the demo above, the rotator is configured to scale down the main photos; thus, they appear larger in the lightbox.
If you're using the Dreamweaver extension version and are comfortable editing code, you can alternatively specify separate photos to be displayed in the lightbox. To do this, you will need to edit the EasyRotator HTML code. Near the top, locate the <li> items in the content section. For example:
<div data-ertype="content" style="display: none;">
   <ul data-erlabel="Main Category">
      <li>
         <img class="main" src="images/flowers/10540268.jpg" />
         <img class="thumb" src="images/flowers/10540268.jpg" />
         <span class="title">Title Text 1</span>
         <span class="desc">Lorem Ipsum is simply dummy text...</span>
      </li>
      <li>
         <img class="main" src="images/flowers/11008113.jpg" />
         <img class="thumb" src="images/flowers/11008113.jpg" />
         <span class="title">Title Text 2</span>
         <span class="desc">Lorem Ipsum is simply dummy text...</span>
      </li>
      ...
To specify a separate lightbox photo for a given slide, add data-srcLightbox="path/to/alternate_photo.jpg" to the <img class="main" ... /> line for that slide. Using the example above, here's how it would look:
<div data-ertype="content" style="display: none;">
   <ul data-erlabel="Main Category">
      <li>
         <img class="main" src="images/flowers/10540268.jpg" data-srcLightbox="images/flowers/10540268_large.jpg" />
         <img class="thumb" src="images/flowers/10540268.jpg" />
         <span class="title">Title Text 1</span>
         <span class="desc">Lorem Ipsum is simply dummy text...</span>
      </li>
      <li>
         <img class="main" src="images/flowers/11008113.jpg" data-srcLightbox="images/flowers/11008113_large.jpg" />
         <img class="thumb" src="images/flowers/11008113.jpg" />
         <span class="title">Title Text 2</span>
         <span class="desc">Lorem Ipsum is simply dummy text...</span>
      </li>
      ...
As I mentioned before, though, this step is purely optional.
And... Enjoy Your Lightboxes!
It's as simple as that – reload your page, and click on a photo in the rotator. It should launch a lightbox, allowing for larger, distraction-free viewing. (Please note that this script is only intended for photo sliders; videos aren't currently supported.)
Enjoy the script? Share your examples in the comments below!